

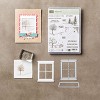
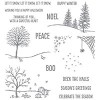
Introducing the Happy Scenes stamp set and the Hearth & Home Thinlits set that coordinates! BTY, these come in a bundle that's linked below so you can save 15% on the deal!
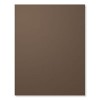
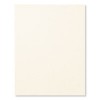
To make this project you will need to cut; Early Espresso 11 X 4 1/4", DSP of your choice 5 1/4 X 4", Scrap of Early Espresso large enough to fit the window die, Scrap of Very Vanilla large enough to fir the window die, Craft Foam large enough to fit the window die, Window Sheet large enough to fit the window die interior.
Let's get started!
1. Score and fold the Early Espresso at 5 1/2" to create a standard A2 top-folding card base. Using Snail adhesive, attach your chosen piece of DSP to the front of the card making sure to center it nicely. You're going for a sort of wall paper look with the DSP.


2. Using the fall pumpkin scene from the Happy Scenes stamp set and Early Espresso ink, stamp the image on the scrap of very vanilla. Color the image in with Stampin' Write markers. The colors used in this card are Tangelo Twist and Always Artichoke for the pumpkins plus Hello Honey, Cajun Craze and Cherry Cobbler for the leaves.


3. Once the image has been colored use Soft Sky, Marina Mist and Old Olive with Stampin' Sponges to lightly color in the sky and ground. Use a light hand with the sponges and smearing isn't a problem.


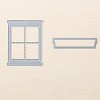
4. Using the Hearth & Home window Thinlit die, cut a window from the scrap of Early Espresso and the craft foam.


5. Cut the window sheet piece to fit inside the window and attach to the back of the die cut with Snail adhesive.

6. Trim down the craft foam die cut as shown and use the Fine Point Glue Pen to add small dots of glue over the front of the craft foam. Adhere the Early Espresso piece over the craft foam piece paying careful attention that the paper and foam line up well in the center of the window.


7. Place the completed window piece over your colored and ink image piece and make light pencil marks around the outside edges. Take the image piece and trim each side just inside the pencil lines. Using Tombow Mono Multi glue, adhere the window piece to the image and then place a large block over the back for a few minutes to make sure everything stays together as intended.


8. Attach the completed window piece to the card base front centered and little toward the top.

9. Using the "Wishing You A Happy Halloween" stamp from the Happy Scene set, stamp it onto the remaining Very Vanilla in Early Espresso ink. Trim the stamped sentiment down to a strip and flag the ends.


10. Using Stampin' Dimensional "bones" on the back of the sentiment strip, attach it to the card base centered underneath the window.


~And your card is complete!
HAPPY STAMPING!
 |  |  |  |
 |  |  |  |
 |  |  |  |
 |  |  |  |
 |  |  |  |
 |  |
No comments:
Post a Comment