

Very recently I became an Independent Demonstrator with Stampin' Up! and I've been working to put all kinds of things together for you using Stampin' Up! products.
Today's post includes a video and written tutorial below along with interactive products links that will take you right to my Stampn' Up! online store where you can shop any time, day or night!
And now... on to the card!
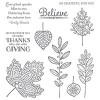
Today's card features a brand new stamp set from our 2015 Holiday Catalog! Products in this catalog will only be available through January 4, 2016 so be sure to shop early!
To make this card you will need to cut the following pieces of cardstock: Crushed Curry 11 X 4 1/4", Cherry Cobbler 5 1/4 X 4", Whisper White 5 1/8 X 3 7/8" and 5 1/4 X 4" (inside panel). Additionally, cut a piece of fun or craft foam to 5 X 3 3/4".
1. Take the piece of Crushed Curry cardstock and score it on the long side at 5 1/2". Fold it over on the score line and you have now created an A2, top-folding card base.
2. Using the smaller piece of Whisper White cardstock, the Lighthearted Leaves stamp set and the photo above, stamp the sentiment in a neutral ink color at the center of the panel and fill in around with the leaves in Crushed Curry, Garden Green and Cherry Cobbler.
3. Using a Stampin' Sponge and the neutral ink color chosen, lightly ink the edges of the stamped Whisper White panel.
4. Using Snail adhesive, attach the stamped panel to the Cherry Cobbler panel being sure to center it nicely.
5. Using Fast Fuse adhesive, attach the craft foam piece to the back of the Cherry Cobbler panel being sure to center it so that it will not show from the front.
6. Again using Fast Fuse adhesive, attach the completed front panel to the card base being sure to center it nicely.
7. Optional: decorate the larger Whisper White panel and attach to the inside of the card using Snail adhesive.
~And your card is complete!
 |  |  |  |
 |  |  |  |
 |  |  |  |
 |
No comments:
Post a Comment