It's another Tuesday and I'm back with another fabulous new Christmas card using Stampin' Up's new stamp set, Reason for the Season!
This was one of those projects that once I got into it, I just kept going and going until I had to make myself stop... less is more you know ;)
To make this project you will need to cut;
*Real Red: 8 1/2 X 5 1/2"
*Garden Green: 5 1/4 X 4"
*Watercolor Paper: 5 X 3 3/4"
I've also used a gold metallic pen that Stampin' Up! has discontinued but it was used only for highlighting and is optional.
Reason for the Season by Stampin' Up!
1. On the watercolor paper using Archival Basic Black ink, stamp the flower outline image around the edges leaving room in the center for your chosen sentiment. I placed the actual stamp in the middle of the card and placed images around it.
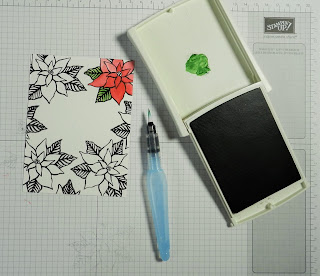
2. Squeeze the Real Red ink pad in the center of the cover before opening. This will deposit some ink on the inside of the cover that you can use as a palette. Using an Aqua Painter, pick up a bit of ink off the cover and carefully paint in the flower images. Using more water will give you more of a "watercolor" look.
3. Repeat the steps above with the Garden Green ink pad and paint in the leaves of the flowers.
4. Once your painting is completed, set your piece aside and let it dry completely.
5. Using Real Red ink, stamp the sentiment in the center of the card. We do this after the painting is complete so that the sentiment is not inadvertently smeared while painting.
6. I used a Crushed Curry Stampin' Write Marker to fill in the centers of the flowers and two other pens to add highlights to the images; Gold Stampin' Dazzle Marker (Discontinued) and a White Signo Uni-Ball Gel Pen.
8. Using Snail, attach the finished front panel to the Real Red card base.
9. ...And because I can never leave 'good enough' alone, I broke out some White Perfect Accents and added 3 to the front of the card... and that finished it off!
HAPPY STAMPING!
Built for Free Using: My Stampin Blog
*Click the "Supply List" above to print!


No comments:
Post a Comment