Showing posts with label Watercolor. Show all posts

Tuesday, January 10, 2017

Watercolor & Birthday Blooms Handpainted Card

Card Design from Stampin' Up! Annual Catalog
What could be more lovely than a hand-painted Birthday Card?

This little beauty was very easy to make and that's saying something because, artist I am not!

I simply stamped the large image from the Birthday Blooms stamp set in Staz-On black ink and then scribbled some with our new Watercolor Pencils...


After that, it's a simple matter of adding a little water with your Aqua Painter!


Once my painting was complete I simply cut the watercolor paper down to 5 1/2 X 3 3/4" and attached it to the front of an A2 card base I made of Rich Razzleberry cardstock.

Add a couple strips of vellum and a sentiment from the same stamp set cut out with one of the Stitched Shapes Framelits and you have a beautiful card for someone special!


Take Care,
Stephanie


Monday, January 2, 2017

Beautiful You Sneak Peak & Video

It's just a couple of days away now... the launch of the Occasions 2017 catalog!

Today I'm sharing a sneak peak of one of my favorite stamp sets from the catalog, Beautiful You.

Beautiful images and tons of great sentiments, this set should top your "must haves" list this season!


Cardstock:
Stampin' Up! Note Cards & Envelopes in Whisper White
Basic Black: 4 3/4 X 3 1/4"
Stampin' Up! Watercolor Paper: 4 5/8 X 3 1/8"

Beautiful You Stamp Set - Available January 4th
Stampin' Up! Watercolor Pencils - Available January 4th
Jet Black Staz-On Ink
Stampin' Up! Aqua Painter

Tuesday, October 6, 2015

Watercolor Reason for the Season Card

Howdy Stampers!

It's another Tuesday and I'm back with another fabulous new Christmas card using Stampin' Up's new stamp set, Reason for the Season!

This was one of those projects that once I got into it, I just kept going and going until I had to make myself stop... less is more you know ;)

To make this project you will need to cut;
*Real Red: 8 1/2 X 5 1/2"
*Garden Green: 5 1/4 X 4"
*Watercolor Paper: 5 X 3 3/4"

I've also used a gold metallic pen that Stampin' Up! has discontinued but it was used only for highlighting and is optional.

Reason for the Season by Stampin' Up!


 1. On the watercolor paper using Archival Basic Black ink, stamp the flower outline image around the edges leaving room in the center for your chosen sentiment. I placed the actual stamp in the middle of the card and placed images around it.


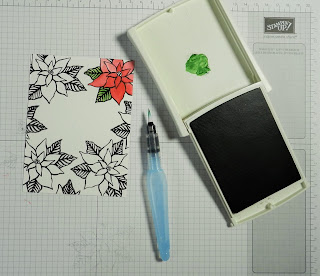
2. Squeeze the Real Red ink pad in the center of the cover before opening. This will deposit some ink on the inside of the cover that you can use as a palette. Using an Aqua Painter, pick up a bit of ink off the cover and carefully paint in the flower images. Using more water will give you more of a "watercolor" look.

3. Repeat the steps above with the Garden Green ink pad and paint in the leaves of the flowers.


4. Once your painting is completed, set your piece aside and let it dry completely.

5. Using Real Red ink, stamp the sentiment in the center of the card. We do this after the painting is complete so that the sentiment is not inadvertently smeared while painting.

6. I used a Crushed Curry Stampin' Write Marker to fill in the centers of the flowers and two other pens to add highlights to the images; Gold Stampin' Dazzle Marker (Discontinued) and a White Signo Uni-Ball Gel Pen.


 7. Using Fast Fuse adhesive (to handle any warping of the watercolor paper), attach the watercolor panel to the Garden Green panel.

8. Using Snail, attach the finished front panel to the Real Red card base.

9. ...And because I can never leave 'good enough' alone, I broke out some White Perfect Accents and added 3 to the front of the card... and that finished it off!

HAPPY STAMPING!
Built for Free Using: My Stampin Blog


*Click the "Supply List" above to print!

Wednesday, July 29, 2015

Leaving on a Jet Plane...

Hello, Hello All!

A quick post this morning to share the card I made for the newest CASology Cue Week 157: WINGS!

I, Like I'm sure the majority of us do, have a ton of bird and butterfly stamps and sets but I wanted to do something differently this time. So I broke out a stamp set I received recently from a drawing on YouTube!

I added a little Broken China Distress ink "watercolor" painting to create my sky and a little sentiment by PTI to finish it all off.

A cute and simple little card... it would only have taken a few minutes if not for allowing the water to dry and fussy cutting the airplane... pretty proud of that one :)


Supplies Used:
Paper - Bazzil Marshmallow, Bin Stock in Blue & Watercolor paper
Inks - Broken China Distress Ink, Stampin' Up! Real Red & Versafine Black Onyx
Stamps - Papertrey Ink Flower Fusion #6 & TPC Studio Transportation Clear Stamp Set
Other - Wink of Stella Clear Glitter Pen & Pretty Pink Posh Sparkling Clear Sequins

Sunday, May 31, 2015

Live, Love Cards May Challenge ~ Watercolor

Oh my goodness peeps! I've got lots of cards to post today... this is only the first so stay tuned!

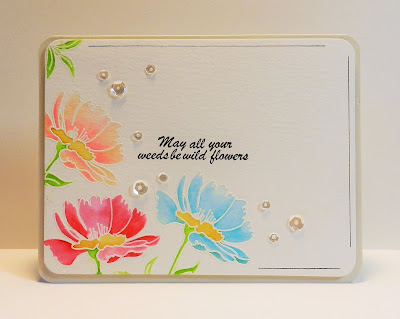
This card was made for the Live, Love Cards May Challenge where we were to use Watercolor on our cards. I really love the way it came out, don't you?!

And there's a story about the stamp set I used to make it.

Not too awful long ago, Deepti Malik released her first stamp set called Blooming Buds through Stamplorations. To celebrate her first release, she and Stamplorations both did a giveaway on their respective blogs... and I won on Deepti's blog! I received this set in the mail earlier this week and I was just itching to use it and the perfect flower outlines were begging to be watercolored!

I stamped the images in VersaMark and then white heat embossed them to create little "wells" for my colors and then I painted it all in with my Akashiya Sai Watercolor Brush Pens. The colors turned out beautifully!

The sentiment is from Deepti's set as well and then it was just a hand drawn border and a few Pretty Pink Posh sequins to finish it up!

I love this set and it's available now in the Stamplorations shop!

See you soon!

Wednesday, May 13, 2015

Let Your Light Shine

Good Morning! Today's post is going to serve a few purposes... 1. To introduce my entry for the Less Is More Challenge #223: One Layer Card with a Water Theme. 2. I'm also entering this card into CAS on Sunday's Challenge #58, Cheer Up Buttercup! 3. I want to tell you about these watercolor brush pens I found on Amazon while I was agonizing over the price of the Kuretake Clean Color pens...

Okay so first off... The Less Is More challenge this week required a one layer card with a water theme... and what is more perfect to make water than watercolor?! I used a lighthouse stamp that I bought in a big jumble of old stamps that needed some TLC so I have no idea where it came from or even how old it is but it worked well for this card!

I recently watched a video by Jennifer McGuire on using some watercolor pens to go over stamped lines and then fill in images with gradient color and so that 's what I tried to do here. The original stamped image was incredibly detailed though so I wound up "stylizing" the final result quite a bit.

Over at CAS on Sunday, the challenge is to make an uplifting card for someone who needs cheering up. As I was looking for sentiments to add to this card I came across a mini set from PTI called Lighten Up and decided on the "Let your light Shine" stamp... you know... "light"house and shine for someone who may be feeling a little dull... Okay, I'm sure you get it :)

Finally... I was on Amazon a few weeks ago looking at Watercolor Brush Pens and cringing at the nearly $100 price tag for 20 or so pens... and that's when I saw them... Akashiya Sai Watercolor Brush Pen Set. I got a 20 pen set for $31.00 with free shipping (now cheaper) and while I have never tried the others I can tell you these pens are wonderful and so very fun to play with! If the price tag on some of them is making you a bit uncomfortable but you really want to try the Watercolor Brush pens, this set is a marvelous alternative!

Supplies Used:
Paper - Watercolor Paper
Stamps - Lighten Up Sentiments (PTI); Lighthouse stamp by Unknown maker
Inks - Antique Linen Distress Ink; Versafine Black Onyx
Other - Akashiya Sai Watercolor Brush Pen Set (See link above)

Friday, March 20, 2015

All Things Grown With Love

I'm really starting to like watercolor painting... or I guess it's sort of painting.

I've made this card for the CASology: Week 138: Blossom Challenge and I figured what better stamp to use than Stampin' Up's Blended Bloom!

I loved this stamp as soon as I saw it! It was likely created to showcase their Blendabilities markers but sadly, those are no longer... and I already had Copics so I didn't buy too many of them anyway. 

Regardless, the stamp is awesome because you can do so much with it... Copics, Colored Pencils, or inky watercoloring like I've done here!

I started by stamping in VersaMark on watercolor paper and then heat embossing with Hero Arts white embossing powder. It was then just a matter of filling in each petal with inks and lots of water. I used Distress inks which pretty much guarantees a beautiful blending of the colors! Just remember to always let them dry completely before making on a final judgement on your project; I thought I'd killed this one when it was wet but I came back later to find a gem when it was totally dry!

I finished off the card by trimming the watercolor paper down to a narrow strip and mounting it on a white card base. I then mounted my sentiment stamp at a curve to "hug" my blossom and stamped it above and below the flower. Finally, and just because I can never leave well enough alone, I added a strip of Plum Pudding cardstock down one side and covered the whole image in Wink of Stella clear glitter pen which I really wish you could see in the picture but... not so much. I promise it's very sparkly!


Supplies Used:
Paper - Stamper's Select White & Plum Pudding (PTI); Watercolor Paper
Inks - VersaMark, Versafine; Distress Inks in Shaded Lilac, Seedless Preserves, Scattered Straw & Mustard Seed (Ranger)
Stamps - Blended Bloom (SU); Garden of Life (PTI)
Other - White Embossing Powder (HA); Wink of Stella Clear Glitter Pen

Thursday, March 12, 2015

The Sweet Life

I have a new love in my life... The Sweet Life stamps and dies by Papertrey Ink! Just look at those flowers... beautiful!

Today's card was created for Papertrey Ink's Make It Monday #204: Watercolor Smooshing.

If you have no idea of what I speak, here's a video that'll show you how it's done... or one of the ways it can be done as there are a bunch. Regardless of the method you choose, it's fun and the results are always a lovely surprise!

I did my "Smooshing" in yellows and oranges at opposite corners from the flower images so that I would have a nice little frame for my sentiment, also from The Sweet Life set.

I am really thrilled with how this card turned out... I love the colors and I LOVE this stamp set!

Supplies Used:
Paper - PTI's Stamper's Select White & Hibiscus Burst, Watercolor Paper
"Smoosh" Inks - Melon Berry, Summer Sunrise & Harvest Gold (PTI)
Stamping Inks - Sweet Blush, Hibiscus Burst, Berry Sorbet, Spring Moss & New Leaf (PTI), Versafine Onyx Black
Stamps & Dies - Papertrey Ink The Sweet Life

Wednesday, March 11, 2015

The One and Only Exquisite You...

Good Morning and Welcome back to Wyoming where the sun has been shining and temperatures have been glorious!

This morning I am introducing my card for the CAS(E) this Sketch challenge, Sketch 113.

I began with a beautiful stamp called Cherry Blossom by Rubber Stampede. I then watercolored the image with PTI inks and mounted it on a base of Sweet Blush cardstock.

The small banners were cut from Aqua Mist and stamped with an older Stampin' Up set called Amazing to Zany.

I think I ended up with a good representation of the sketch and I really love that floral image!

Hopefully it's nice and warm (or at least getting there) wherever you may be... enjoy your day!


Supplies Used:
Paper - Sweet Blush, Aqua Mist & Stamper's Select White by PTI
Inks - Memento Tuxedo Black, PTI Berry Sorbet, Hibiscus Burst, Simply Chartreuse & Fine Linen
Stamp - Rubber Stampede Cherry Blossom
Other - Banner Framelits by SU

Saturday, March 7, 2015

Find Joy in the Art of It

I admit it... I was terrified to make this card...

Introducing my adaptation of this week's Make It Monday Challenge by Papertrey Ink - #203: Doodling With Stamps.

A while back, Papertrey had an exclusive stamp set that you could get free with an order of $100 or more... this is that stamp set; Filled With Joy.

I stamped out the flowers and leaves in several different colors; Summer Sunrise, Orange Zest, Hibiscus Burst, Hawaiian Shores & Simply Chartreuse.

I then took a water brush to them. I didn't actually do a whole lot more than just get them wet and let them dry but they turned out so pretty!

And then came the very scary part... I was to take a black pen to my beautiful flowers and "doodle" on them! ~ As it happens, it wasn't all that traumatic and once I got into it I even did more than just lines... there are some dots in there, little stars, circles and even tiny hearts!

By the time I stopped and looked at the overall effect I was quite pleased with myself!

Thanks so much for visiting today!

Supplies Used:
Paper - Watercolor Paper, Hawaiian Shores by PTI
Ink -  Summer Sunrise, Orange Zest, Hibiscus Burst, Hawaiian Shores & Simply Chartreuse by PTI; Black Staz-On
Stamps - Filled With Joy by PTI
Other - ZIG .01 Black Pen, White Fun Foam

Monday, March 2, 2015

Happy Is As Happy Does...

So what to do when you don't have the sentiment you want for your card... make it yourself!

Today's card was made for two challenges... 

This week's Less Is More Challenge is "This Makes Me Happy". What about this card represents what makes me happy? There's a couple of things actually... I didn't have the sentiment "Happy Is As Happy Does" so I created it with vellum, a VersaMarker and some Ranger Liquid Platinum embossing powder. It makes me happy that I'm creative and I can problem-solve to create the things I want to create. Second, I believe the words... I'm happy when I'm creating and putting all of my creations together to show to you makes me happy!

The second challenge this card will be entered into is Addicted to CAS, Challenge #58 - Distress. One of my favorite techniques is to "watercolor" with Distress Inks and stamps. I used inks in Worn Lipstick, Broken China and Dusty Concord on a Hero Arts stamp to create my floral design!

I've been thinking lately that I can never find just exactly what I want to say in sentiment stamps... I guess I could buy an alphabet set and make them up each time... but wouldn't it be cool to have my own stamps made? Maybe other people would like them too... hmmm... something to think more about.

Supplies Used:
Paper - PTI Classic Kraft, Tim Holtz Distress Watercolor Paper, Vellum
Ink - Distress Inks in Worn Lipstick, Broken China & Dusty Concord, VersaMarker
Stamps - Hero Arts Small Floral
Other - Ranger Liquid Platinum embossing Powder

Wednesday, February 25, 2015

Papertrey Ink February 2015 Blog Hop


It's time once again for Papertrey Ink's monthly blog hop! 


This month' challenge provided and inspiration piece as a starting point for individual creations. I posted a picture of that piece below and you will see that I took the color palette and went my own way with it!

The main panel is watercolor paper to which I added A LOT of water and then dropped on the Papertrey ink colors I had selected in Sweet Blush, Raspberry Fizz, Aqua Mist, Hawaiian Blue & Plum Pudding. The water allowed them to move and swirl... I didn't even really touch it as far as that was concerned and left it to dry on its own.

The sentiment is from PTI's Think Big Favorites set #7 and is heat embossed in Hero Arts white embossing powder. And then, because I had run out of glitter dots at the time I created this, I added dots of Glossy Accents and then just covered them in glitter. If I use this kind of embellishment again though I'll make sure the Glossy Accents dots flatten out a bit before adding the glitter... they're kind of a little too domed for what I was wanting.

Overall, I like the way the project turned out and think it's a great entry to the hop!

Inspiration Piece


Monday, February 23, 2015

Less is More: Week 212 ~ Wings...

I love clean and simple cards... and I really like taking part in the Less is More challenges. As such, here is my entry for week 212 with the theme of Wings.

I started with a panel of Strathmore watercolor paper and used Lawn Fawn's Fly Free stamp set to imprint my little bird in Versamark with clear embossing powder. 


My "paint" was actually Broken China and Wild Honey Distress inks by Ranger and lots of water! I did several layers, drying completely in between. My goal was to make it look like the sun is shining through the clouds behind the little bird.


The panel was finished with one of the sentiments from the Fly Free set embossed in Ranger's Liquid Platinum.


The finished panel was then mounted on a base of Neenah Solar White cardstock to finish the card.


I've recently been a little obsessed with watercolor painting on my cards. It's sort of like Christmas morning with every piece... you just never know how it's going to turn out... at least I don't and I like it that way, the randomness is part of the fun!


Supplies Used:
Paper - Neenah Solar White, Strathmore Watercolor Paper
Stamps - Lawn Fawn's Fly Free
Inks - Versamark, Broken China & Wild Honey Distress Inks
Other - Clear Embossing Powder, Ranger Liquid Platinum Embossing Powder, white fun foam